MMU2S - What is it and how does it work?
This page covers the MMU2S (Multi-Material Unit 2S), Prusa's previous-generation multi-material system. The MMU2S works by feeding up to 5 filaments using a selector and changes the way filament is fed into and out of the extruder. New techniques are used to control the workflow - an interesting change is "ramming": whereby the extruder does a set of moves to make sure that the outgoing filament tip is shaped correctly - sharp. Buckle up, there's plenty to go over.
Note
MMU3 users: Prusa has released the MMU3, which uses a completely redesigned mechanism — new selector design, a different approach to direct drive integration, and significantly different filament handling compared to the MMU2S. If you have the MMU3, the information on this page may not apply to your setup. Please refer to Prusa's MMU3 documentation instead.
Not sure which one you have? The MMU2S uses an external buffer (the large spool-like buffer unit that sits behind the printer) and a separate pulley/selector body that mounts on top of the printer frame. The MMU3 is a more compact unit that attaches directly to the printer and does not require the external buffer. If you have the older buffer-based system, you are in the right place.
Theory of Operation
If you are new to the MMU2S, it is very strongly recommended to watch the video below. It goes into detail on the theory of operation, which could answer many questions that you may have or will have as you work with the unit. Even if you have an idea of how it works, this video will be sure to teach you a number of things. Take it from me. I built one and after watching the video, I wished I had watched it before!
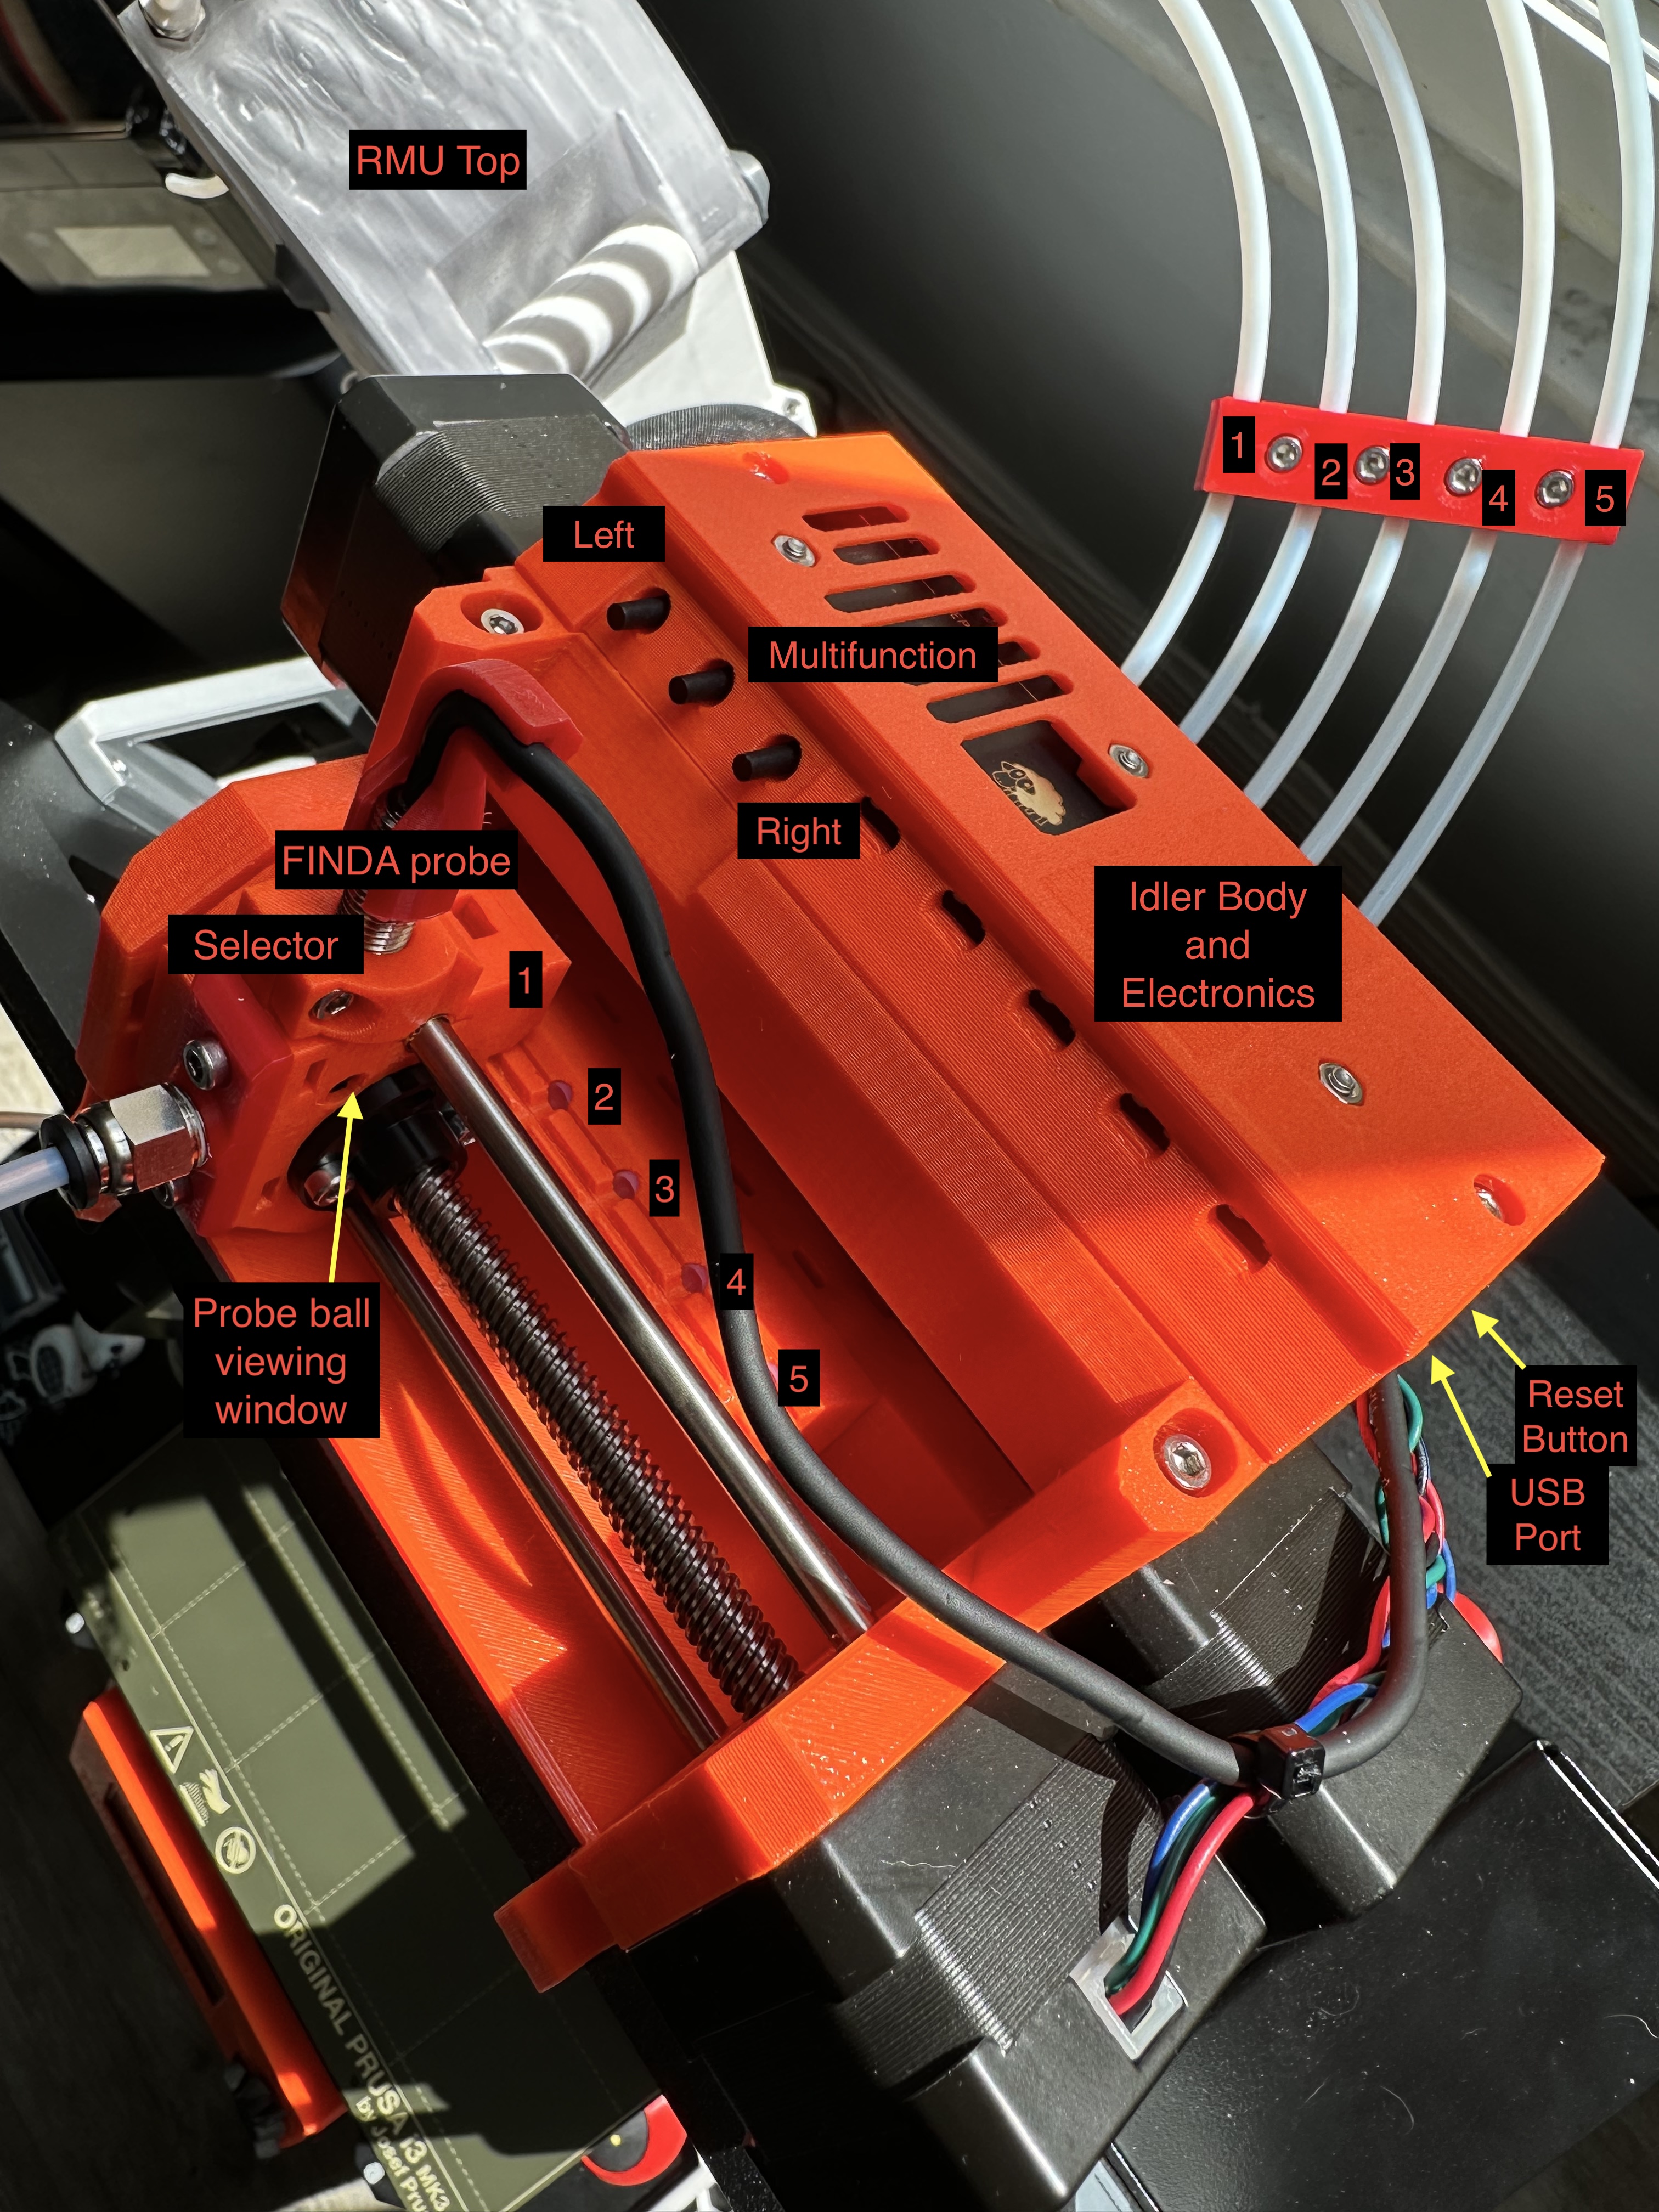
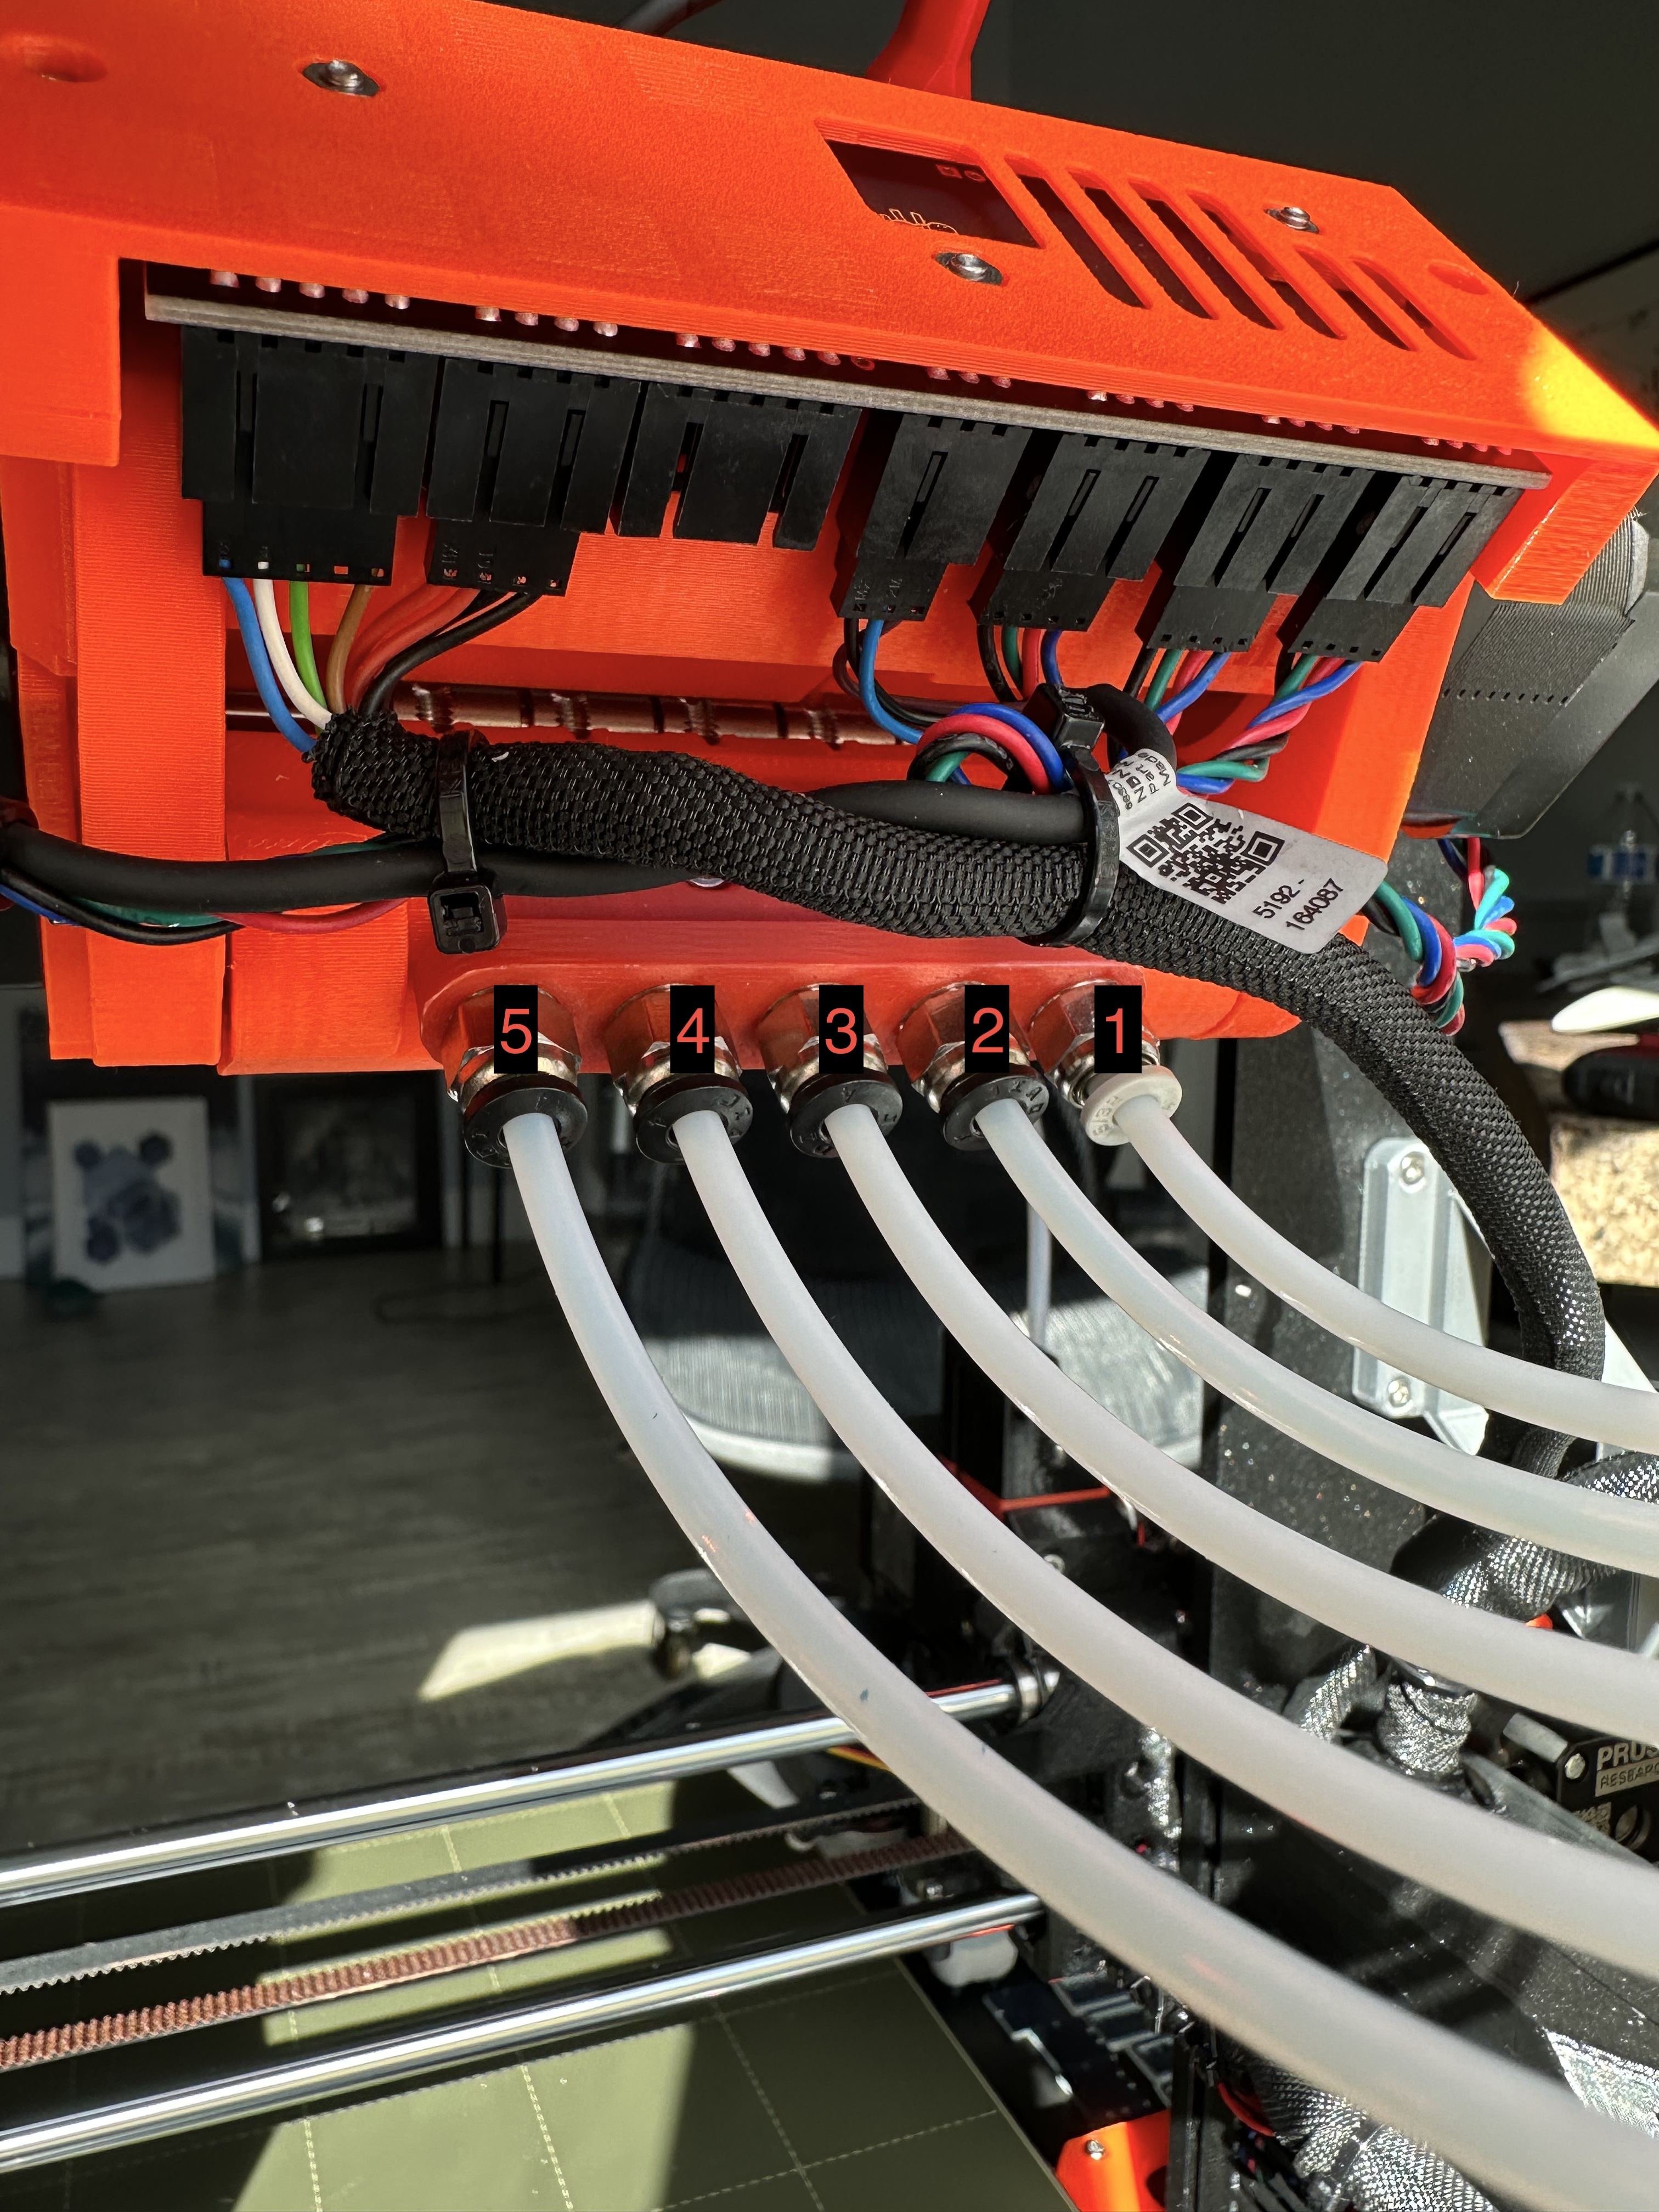
Anatomy
Please reference the pictures below to learn about the MMU2S components
Operation
The MMU2S can provide hours and hours of reliable operation if and only if the user is consistent with maintenance. This includes what to do in between prints.
It also requires that the operator always pays attention to how much friction there is in the filament path.
Warning
The system is VERY sensitive to friction. If it even succeeds to load in a system with high friction, you will see A LOT of under-extrusion in your prints.
The way to gauge this is during initial filament feeding. As you're loading the RMU and/or MMU, using your hands feel if the filament easily guides through the tubes or if there is anything causing friction or blocking it all together. This should also be checked periodically even when filament is loaded because fine filament strings and particles can travel through the tubes and get stuck, causing issues that come out of nowhere. After all, every toolchange means that the old filament has to be pulled back and the new one fed in, so there's a lot of travel.
In Between Prints
Before starting a print, the entire MMU2S unit, extruder, and buffer should be checked for any debris that can either get caught in crevices (which can cause jams with the selector) or can obstruct the filament path. It is highly recommended to have and use cans of compressed air at all times to perform the following:
- [Extruder] Clean out the extruder by blowing 2-3 puffs of air into the extruder idler gear window
- [MMU] Clean out the MMU selector, idler, and pulleys
- [RMU] Clean out the RMU of any debris
In addition, before starting a print, IT IS CRUCIAL TO CHECK ALL PARTS OF THE MACHINE TO MAKE SURE THERE ARE NO OBSTRUCTIONS. Please see below examples:
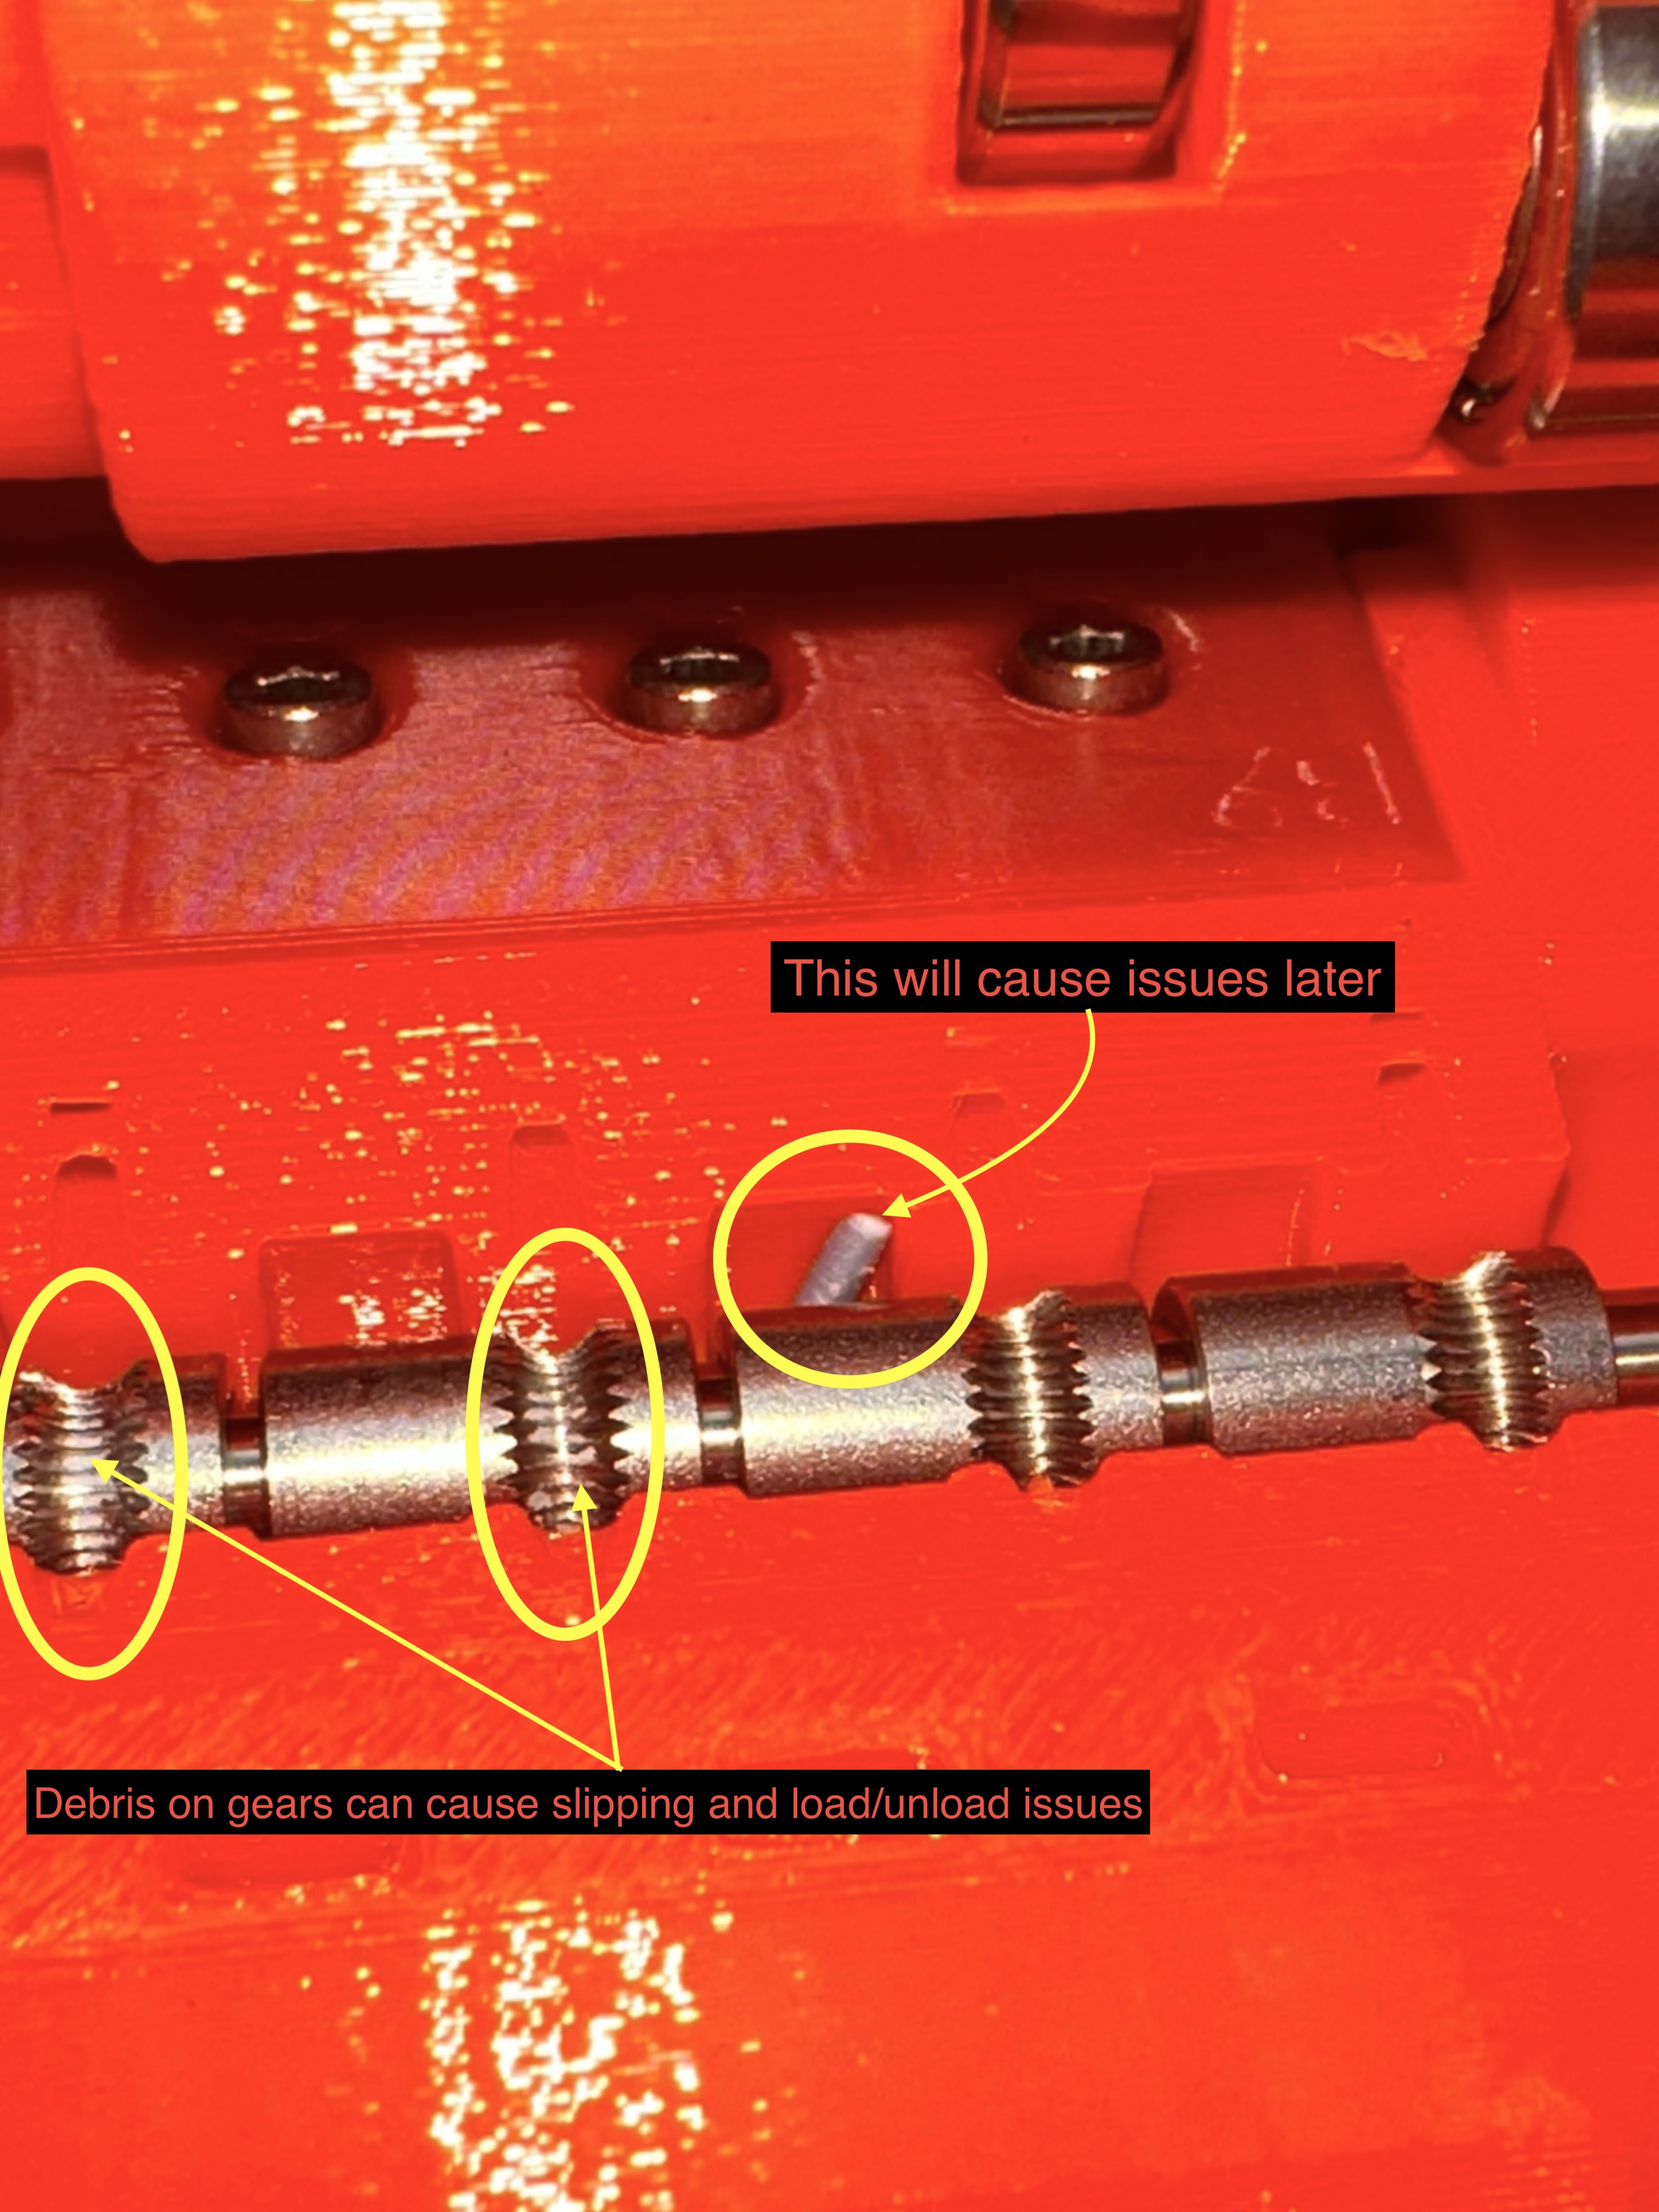
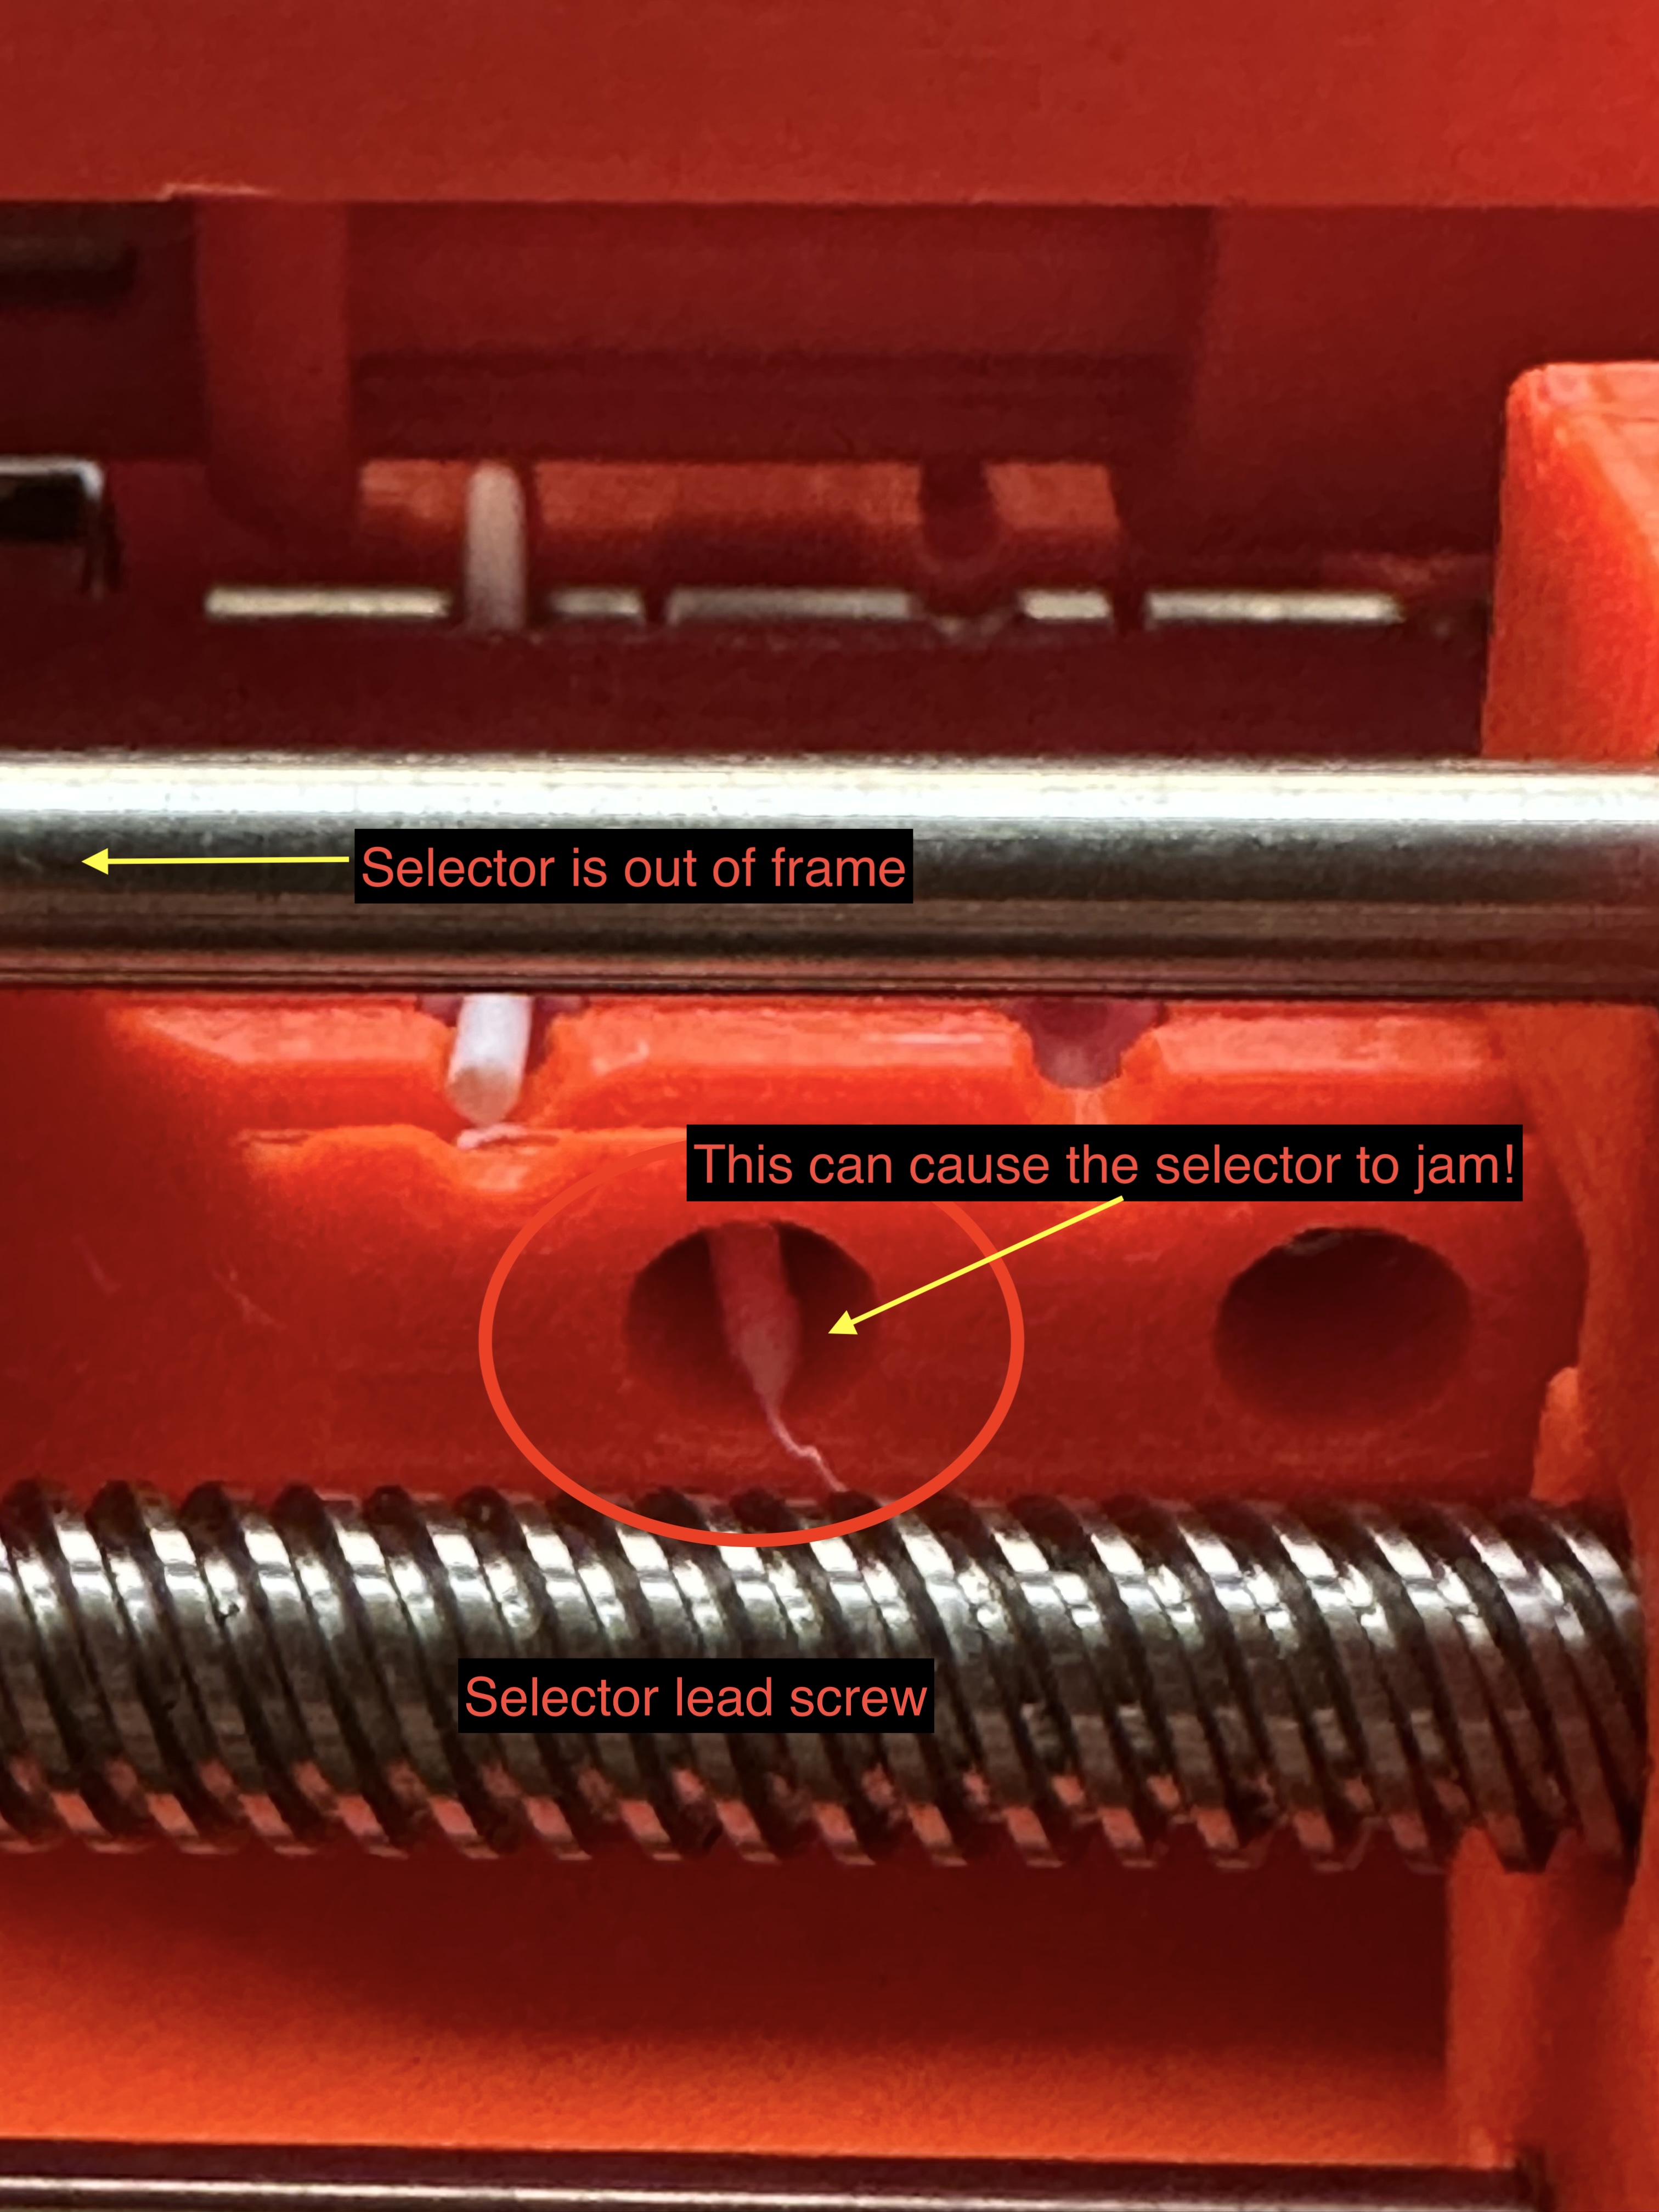
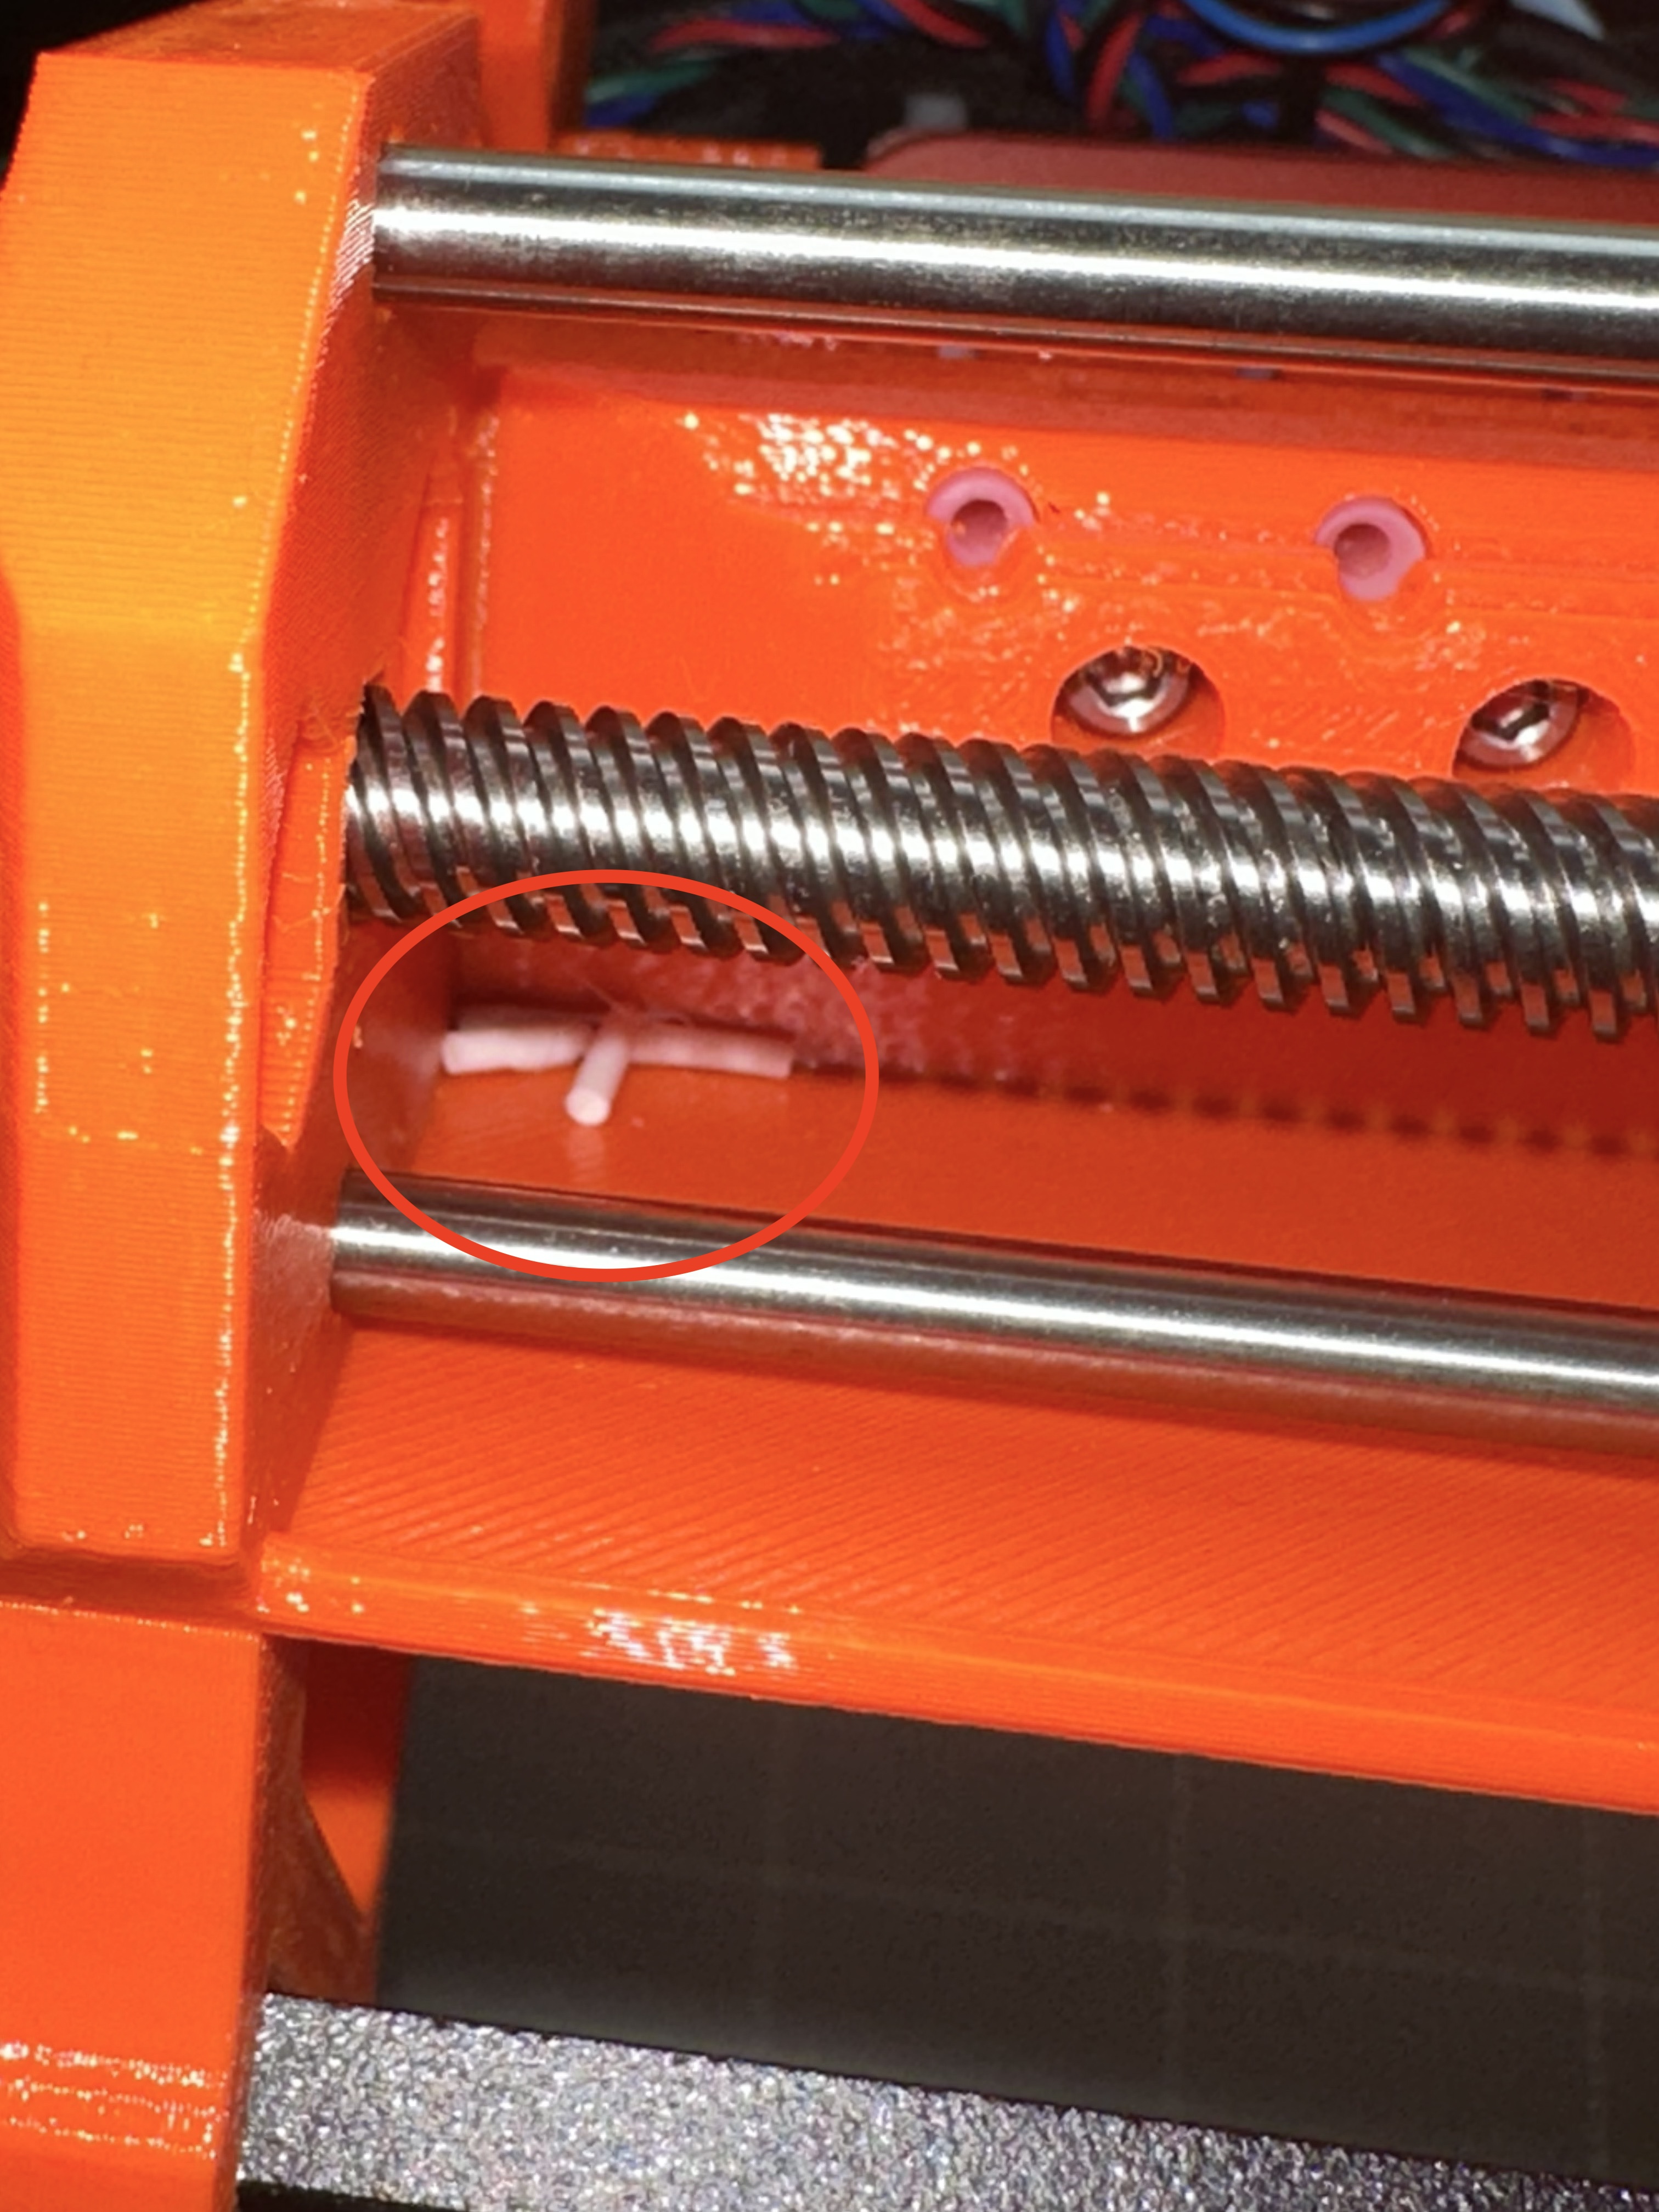
In the last picture, you can see tips of filaments cut by the MMU. These do NOT need to be cleaned between prints, but should be checked and cleaned out periodically and as needed.
I cannot stress enough the following point, so I'll repeat to drive it home:
Danger
AT ALL TIMES, MAKE SURE THE MMU AND EXTRUDER ARE CLEAR OF ANY DEBRIS. Failure to do so WILL lead to failures and frustration.
Filament Tip Quality
Filament tip quality is arguably the single biggest cause of MMU2S failures, so it deserves its own section rather than just a passing mention.
The MMU2S selector is a mechanical system that relies on the incoming filament tip to be consistently shaped in order to guide it cleanly through the selector channel and into the extruder. A poorly formed tip — whether it is a blob, a curl, a frayed end, or an overly blunt cut — will catch on the selector, miss the channel entrance, or stall midway through the load sequence. This causes the kinds of jams and missed loads that are frustrating to diagnose because they appear random when in fact they are entirely tip-driven.
There are two moments when tip quality matters:
- On unload (toolchange): When the MMU2S pulls the outgoing filament back, the "ramming" sequence runs in the extruder to shape the tip of the retracting filament before it clears the hotend. The quality of that tip is controlled entirely by PrusaSlicer's ramming settings. Dialing in those settings for your specific filament is one of the highest-leverage tuning steps you can take.
- On initial manual load: When you cut and feed a filament by hand, use sharp flush cutters and cut at a slight angle to create a clean, pointed tip. A flat or ragged cut is asking for trouble.
Getting tip quality right — both through slicer tuning and good cutting habits — will eliminate the majority of MMU2S load and unload failures.
Loading Filament
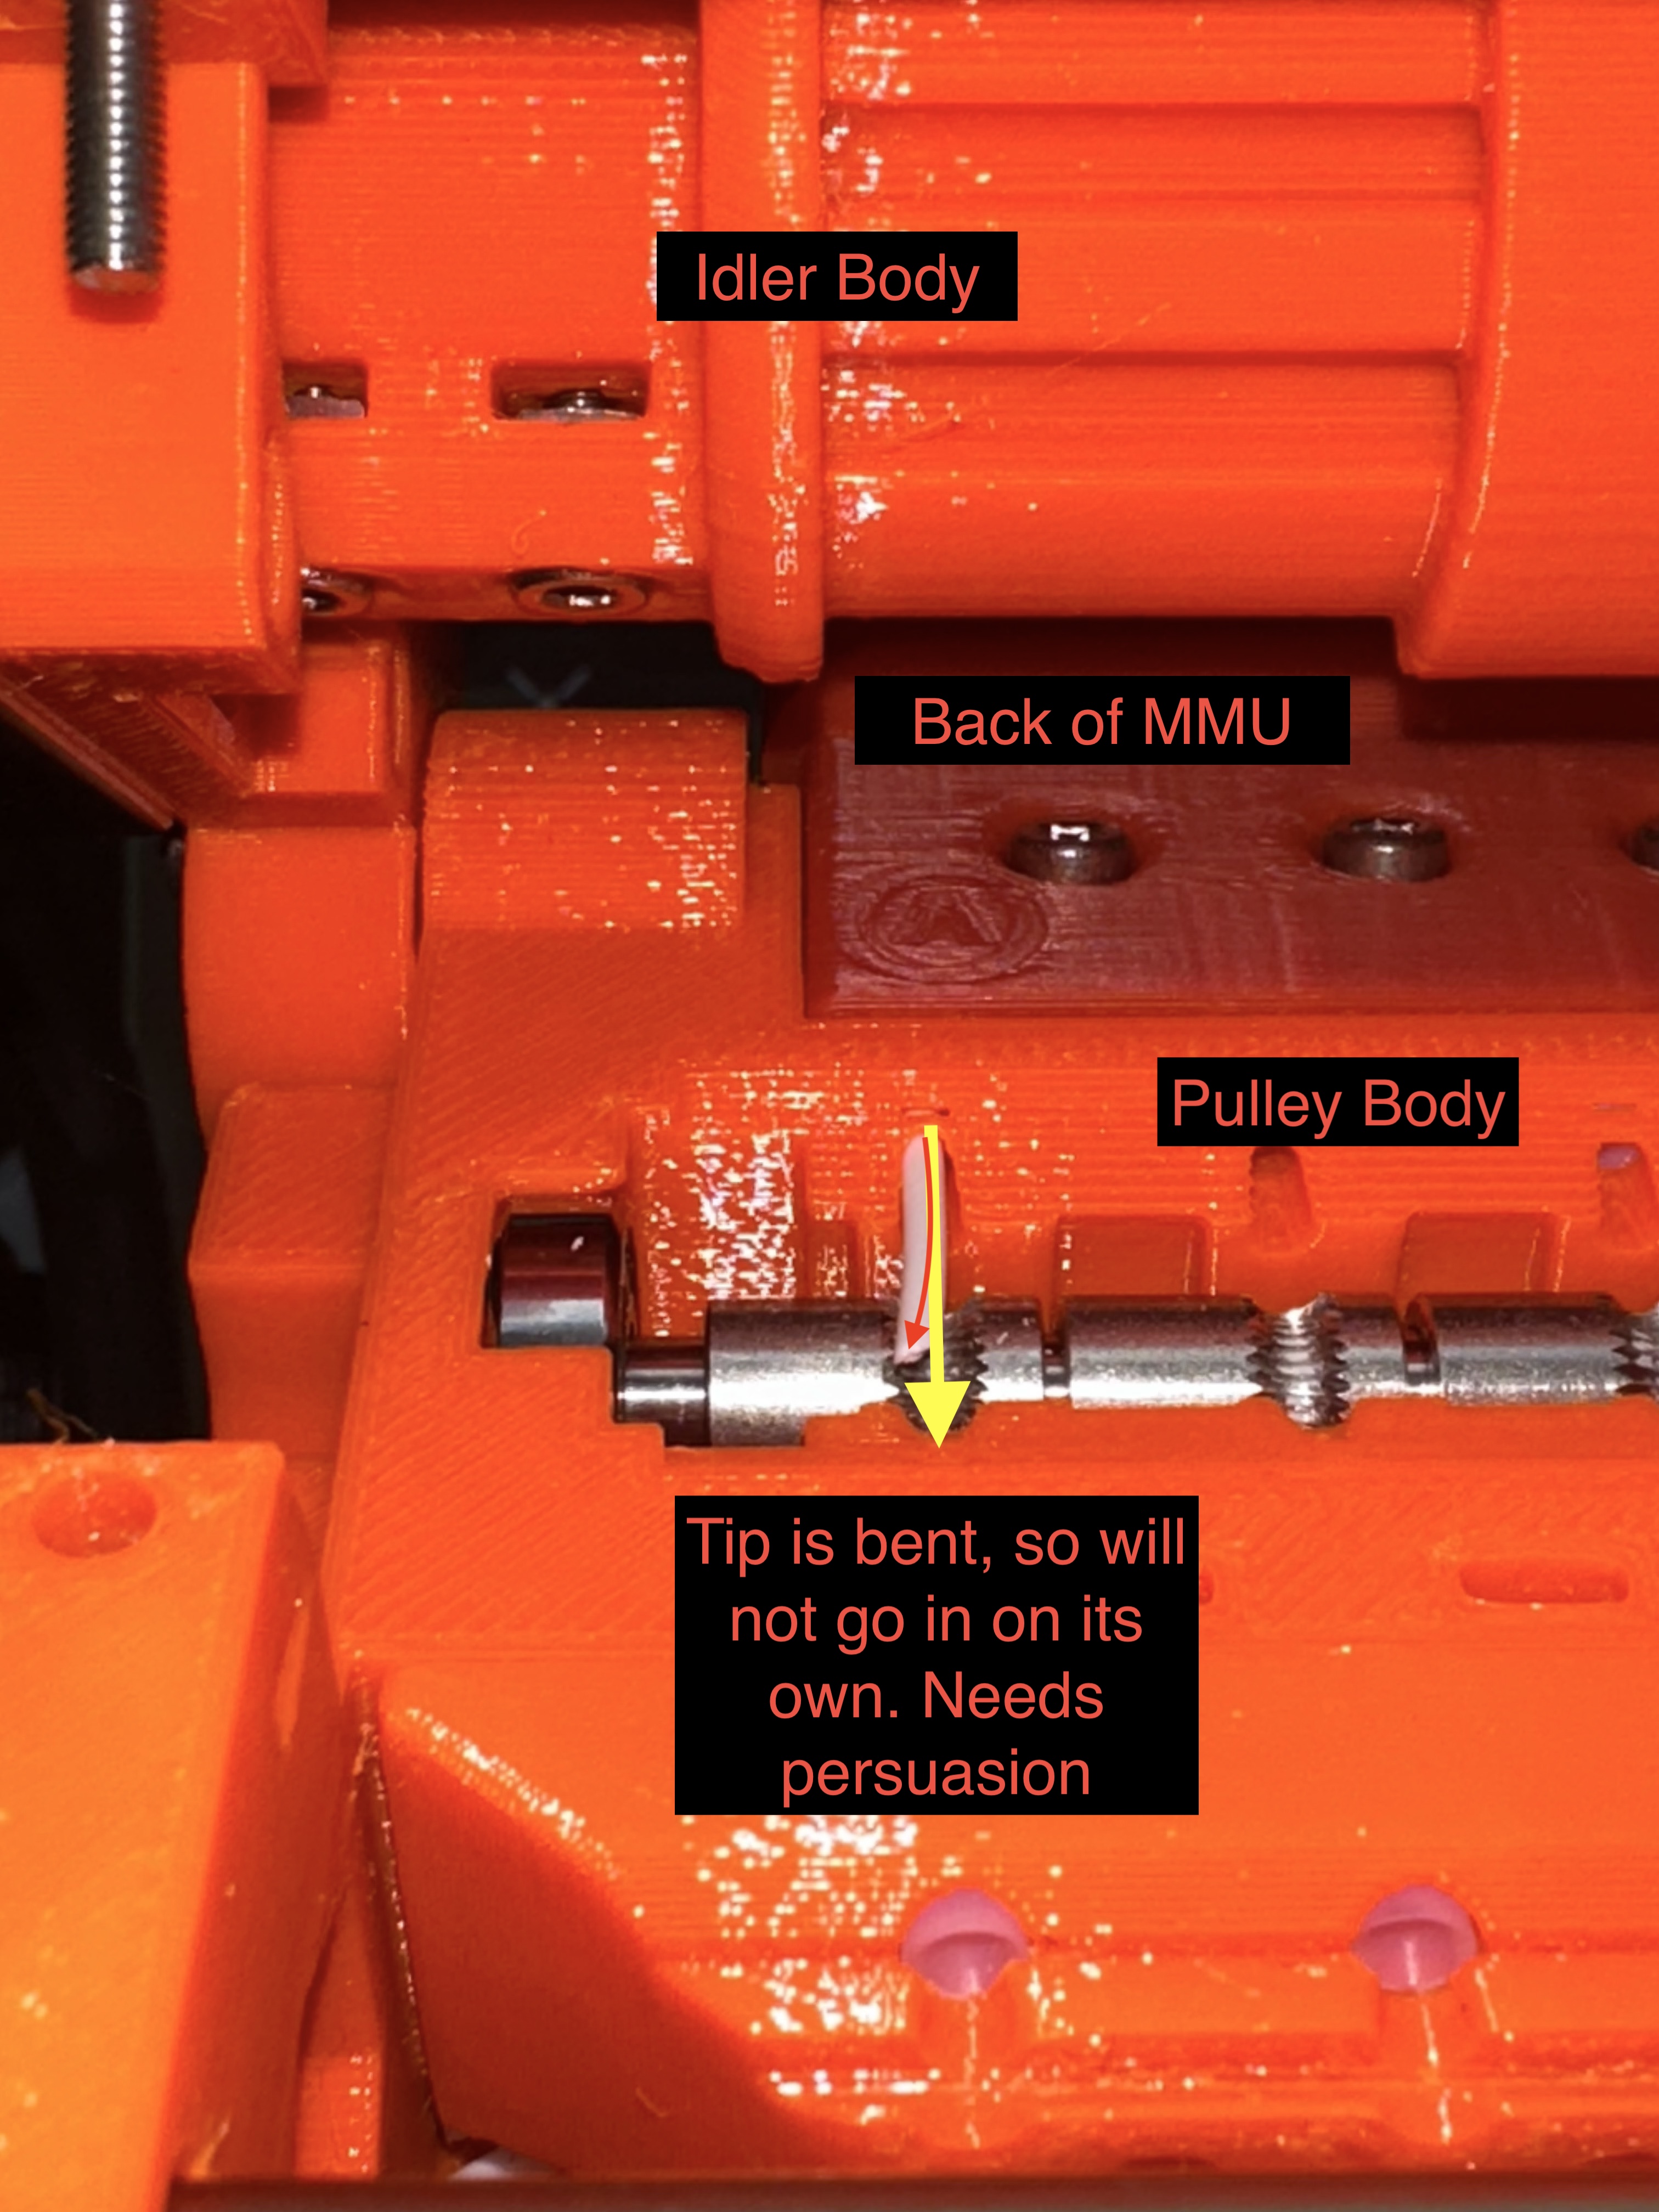
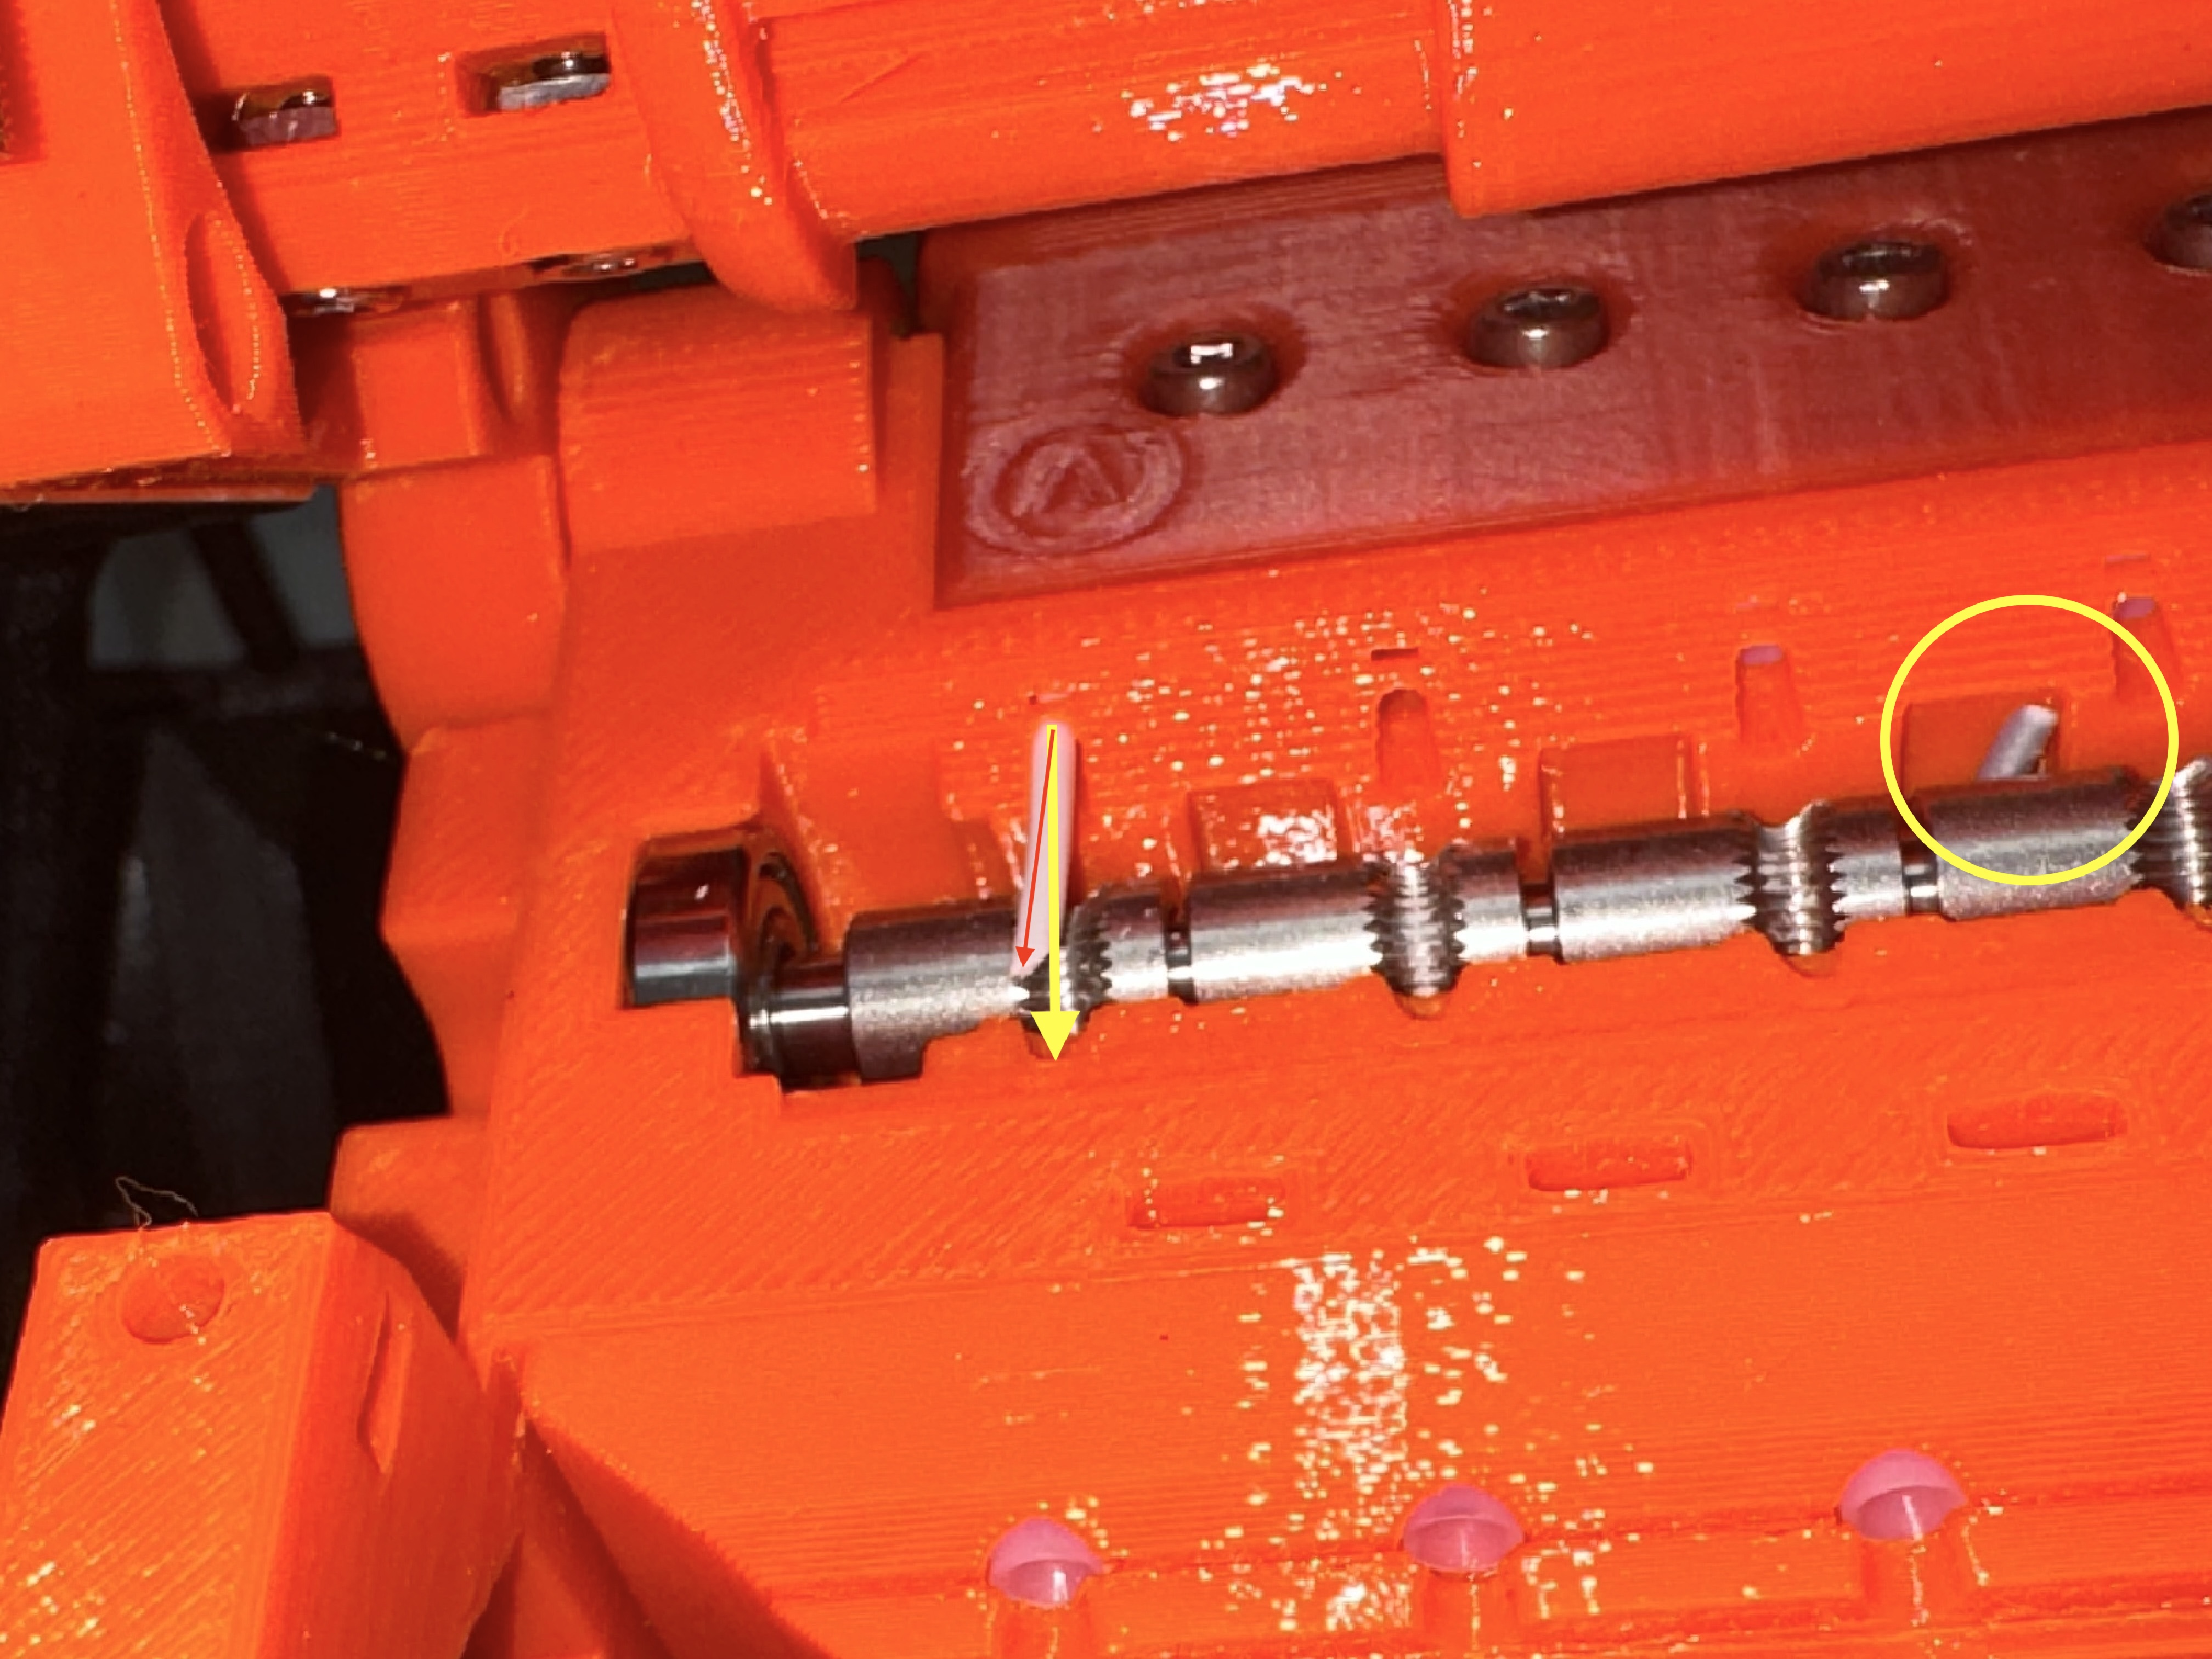
There are a couple of considerations to keep in mind when loading filament into the MMU2S: filament tip and filament "straightness". You want the tip to be sharp and you want the filament to be straight to ensure it goes into each channel correctly.
When cutting the filament tip, use sharp cutters and cut at an angle. As you're loading into the MMU, when it reaches the pulley body you may need to "persuade" the filament in to the final channel by using a small screwdriver or similar tool. You may need to open the idler body or move the selector out of the way using the buttons on the MMU in order to get more clearance.
Then, using the printer menu, choose "Load to MMU" and choose the appropriate channel. See the pictures below for more information.
Slicer Settings
Please see below screenshot. Highlighted are the settings that made the difference between baby-sitting a print and knowing that I don't need to stare at the printer for a successful print.
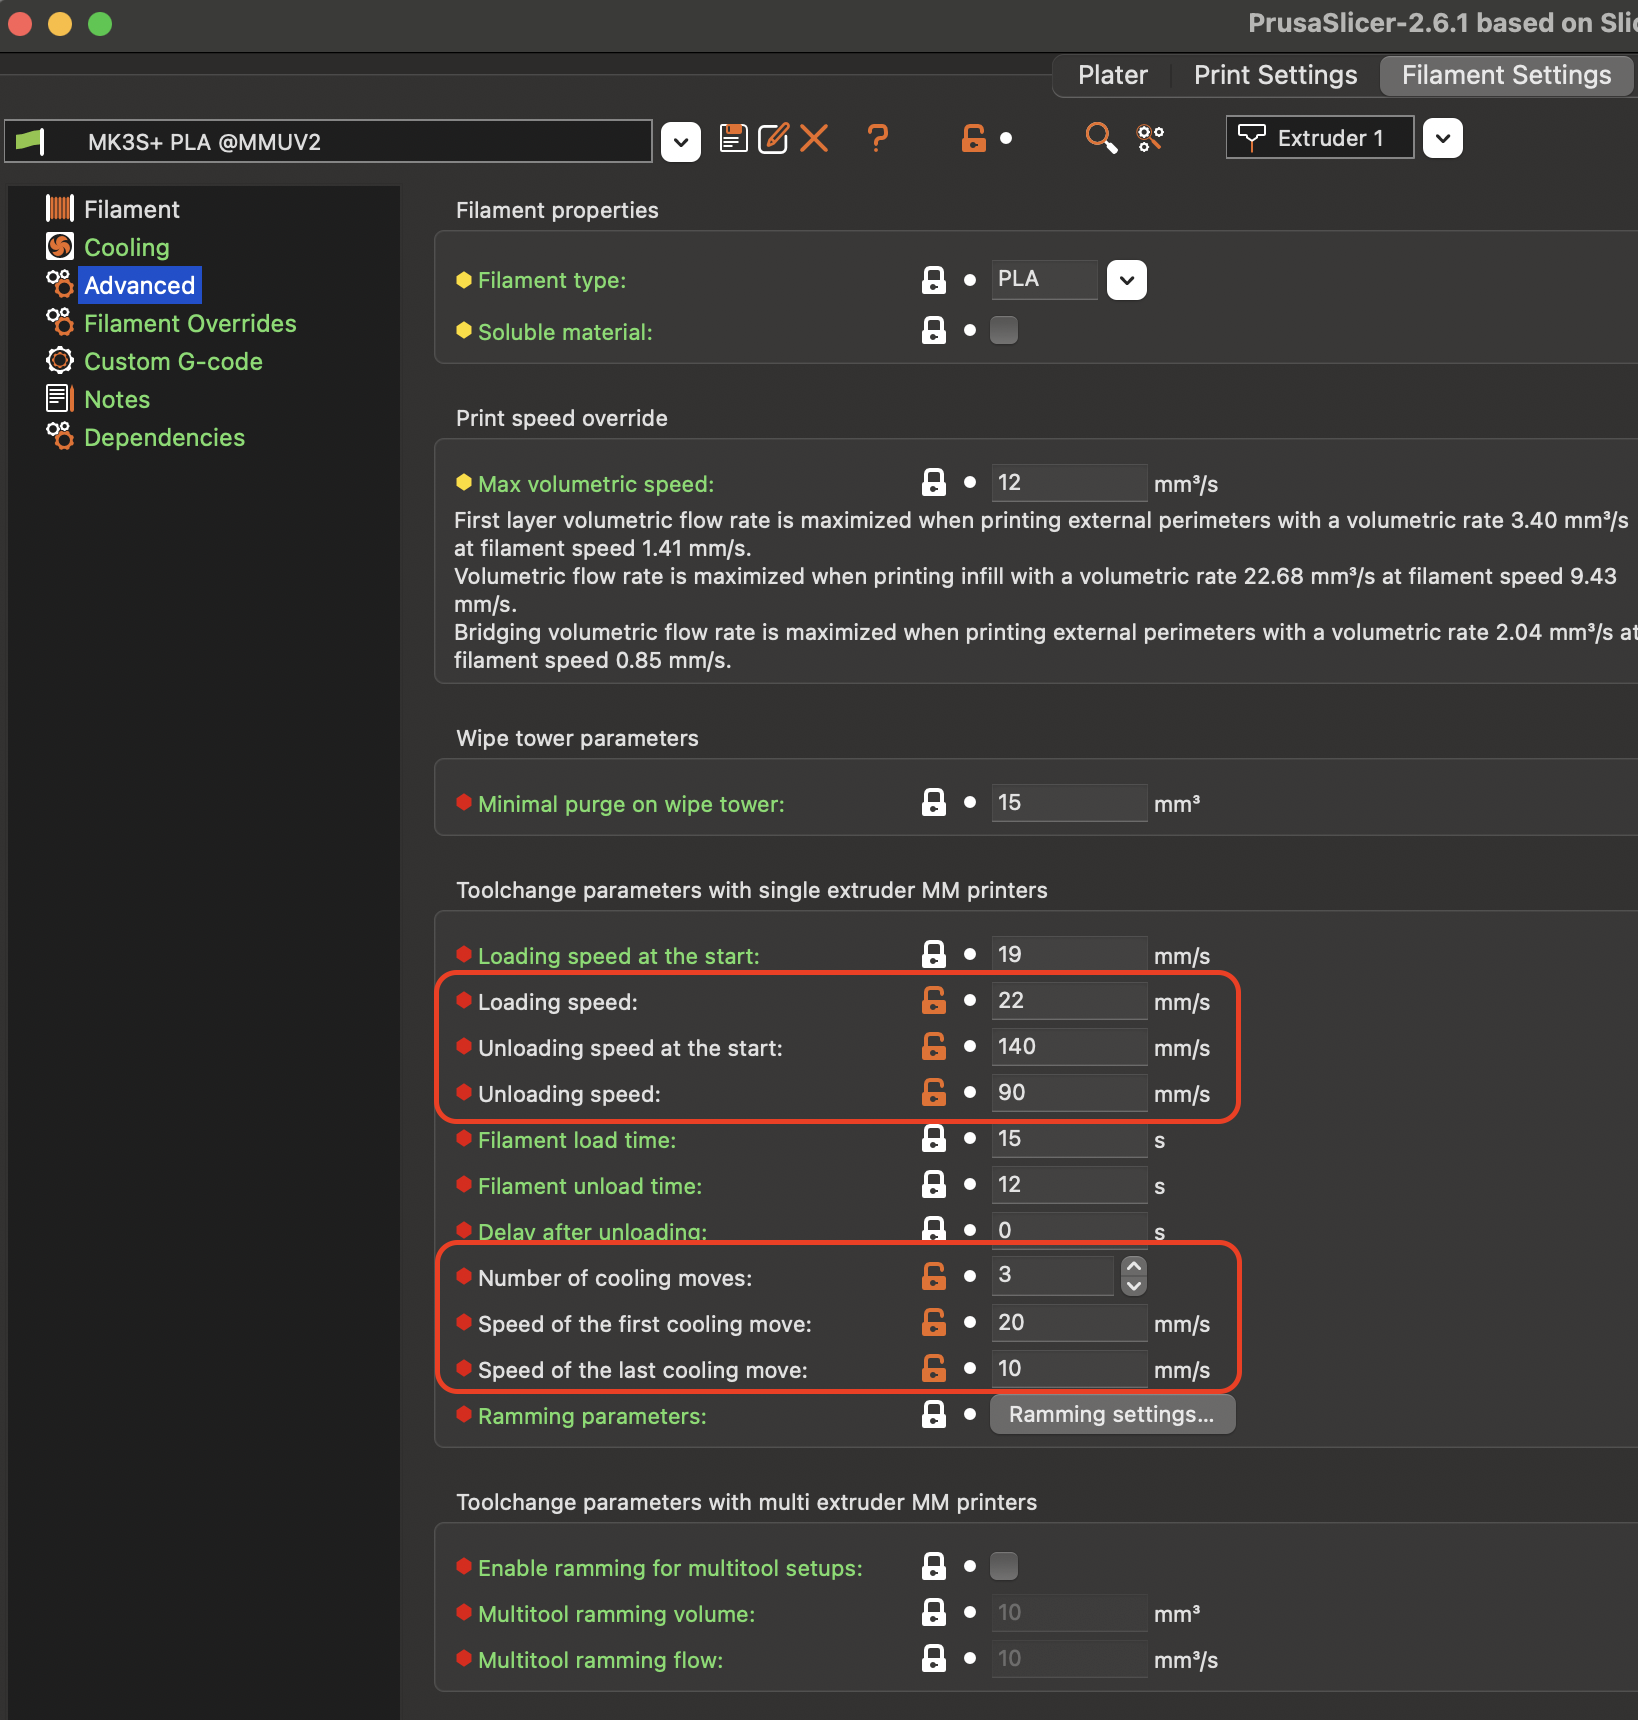
The settings above ensure that both the MMU and extruder work together to "pass the baton filament"
to each other by continuing to feed the filament until both the FINDA probe and the IR
filament sensor confirm that they are triggered.
Below are the config files for the settings I've used to much success. They are INI downloadable files that you can import into your copy:
Warning
These config files are for the MMU2S specifically. They are not appropriate for MMU3 users and should not be imported into a PrusaSlicer profile configured for the MMU3.
- PrusaSlicer config file
- PrusaSlicer config bundle without printer
- PrusaSlicer config bundle with physical printer
Spool Placement
Spool placement is important as it ensures tangle-free operation in addition to preventing more friction being introduced into the system. Please refer to the linked article for more information, as Prusa already did an excellent job documenting this.
Still having issues?
If you're still having issues, please refer to the excellent Prusa troubleshooting page here, their guide on troubleshooting MMU jams, and the Prusa forum posts. If you're completely stuck after reading the docs/posts, please reach out for 1:1 support.